

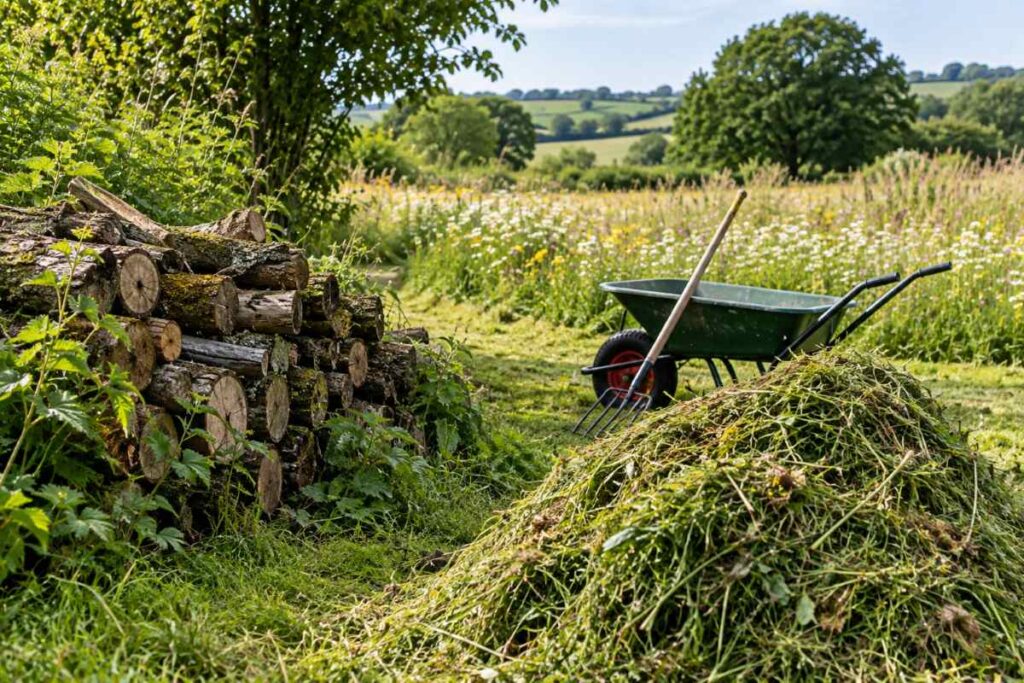
Log Piles, Grass Cuttings and Wildflower Meadows: How to Use Cuttings Responsibly
Every site that manages land produces two things in quantity: cut vegetation and fallen timber. What happens to them afterwards decides whether they become habitat or a problem. The same heap of grass can feed a meadow’s worst competitor or, moved fifty metres, support a grass snake through Winter. The same fallen limb can be a fire risk beside a pitch or the richest deadwood habitat on the site.
There is a persistent piece of advice that says leave everything where it falls, it is better for nature. It is why log piles for wildlife have become a standard recommendation, and why so many sites also leave meadow arisings lying. It is right about some material in some places and badly wrong about others: leave arisings on a wildflower meadow and you will feed the grasses, raise fertility and lose the flowers within three years.
This covers both sides — how to build log piles for wildlife that are safe on a working site, and what to do with the material that comes off a meadow, paddock or golf rough after cutting. It is written for caravan parks, campsites, estates, farms, golf courses, equestrian sites, nature reserves and anyone managing grounds with public access.
What a log pile is, and why log piles for wildlife matter
A log pile is a deliberate stack of untreated wood, left in place to decay. That decay is the whole point. Deadwood is one of the scarcest habitats in the UK, because tidy management has removed it from most of the landscape, and a large number of species depend on it.
- Fungi colonise first and drive the decay process. Many bracket and cup fungi are deadwood specialists, and some are nationally scarce.
- Saproxylic invertebrates — species that depend on decaying wood — include beetles such as Stag Beetle, whose larvae spend years feeding in buried rotting wood before emerging.
- Beetles, woodlice, millipedes and centipedes occupy the damp layers where wood meets soil.
- Amphibians shelter beneath, particularly Common Toad and Great Crested Newt, which spend most of the year on land.
- Reptiles use the warm, sheltered edges. Slow-worms are frequently found under logs and in compost heaps.
- Small mammals and birds use piles for cover and foraging. Wrens and Robins work the gaps; Hedgehogs may nest in larger, well-covered piles.
A well-placed pile starts supporting species within months and improves for a decade or more.
Log piles, dead hedges, brush piles, compost and habitat piles
These terms get used interchangeably and they are not the same thing.
A log pile is heavy timber — trunk sections, thick limbs — stacked to decay slowly, often with the lowest layer part-buried. It is the longest-lasting and most valuable of these features.
A brush pile is loose, light material: thin branches, twigs, prunings. Quick cover for birds and small mammals, but it breaks down within two or three years.
A dead hedge is brash woven between paired posts to form a linear barrier. It does the job of a fence while providing nesting cover, and on visitor sites it looks obviously deliberate and directs footfall.
A compost area processes green material into usable compost. It generates heat, is turned periodically, and is managed rather than left.
A habitat pile is the general term for any heap of material left for wildlife. Habitat piles UK land managers create most often combine woody material with leaf litter or cut vegetation. The distinction matters when planning: a log pile is permanent and left alone, a compost heap is worked and moved.
Where to site log piles for wildlife safely and effectively
Siting decides both the ecological value and whether the feature causes you problems.
Choose shade and dampness. Wood in full sun dries out and decays slowly, supporting far less. Under a hedge, at a woodland edge or on the north side of a building is ideal.
Keep contact with soil. The soil-wood interface is where most of the life is. Set the bottom layer directly on the ground, or bury the base of a few logs upright.
Position away from operational areas. Not against timber buildings, not near fuel or bin stores, and not where machinery works regularly. Keep piles ten metres or more from pitches, play areas and paths where the public has access, both for safety and so they are not dismantled by visitors.
Consider fire separation. Away from barbecue areas, fire pits, smoking areas and dry standing hay or straw.
Think about sightlines. Piles behind hedges or in field corners work; piles at junctions or against boundary fences on a public footpath tend to attract fly-tipping. Avoid flood-prone ground and the base of steep slopes where material can move.
Choosing the wood
Native hardwoods decay in a way that supports the widest range of species. Oak, Beech, Ash, Birch, Hazel, Willow, Cherry and Field Maple are all good, with a mixture better than any single species. Larger diameter is better — anything over 15cm across holds moisture and lasts far longer.
Conifer is acceptable and supports its own set of species, but decays differently and is less valuable overall. Use it if it is what you have.
What must never go into a habitat pile:
- Treated timber. Tanalised, pressure-treated, creosoted or preservative-treated wood leaches copper, chromium and other compounds into the soil. Old fence posts, decking and sleepers are the usual culprits and are among the most common mistakes.
- Painted or varnished wood, particularly anything that may carry lead paint.
- Manufactured boards — plywood, MDF, chipboard, OSB — which contain adhesives and resins.
- Railway sleepers, which are almost always creosoted.
- Wood with nails, screws, brackets or wire still in it, a hazard for both wildlife and anyone handling the pile later.
- Timber from trees felled with notifiable disease where movement restrictions apply. Check current guidance before moving Ash or Elm material off site.
If in doubt about a piece of timber’s history, keep it out. A contaminated pile is worse than no pile.
Building a stable pile with gaps for wildlife
The two requirements pull against each other: the pile must not collapse, and it must have voids inside for animals to use.
- Clear a patch of ground and, if you can, scrape a shallow depression 10–20cm deep. Buried wood decays fastest and Stag Beetle larvae need it.
- Lay the largest logs first, in direct contact with soil, spaced a hand’s width apart rather than tight together.
- Cross-stack subsequent layers at right angles. This is what gives stability and creates the internal voids in one move.
- Keep the pile low and wide rather than tall — under a metre high is safer and holds moisture better. A footprint of 1–2m square is a good starting point.
- Add a proportion of upright pieces, part-buried, standing 30–50cm proud. These mimic stumps and are used by a different set of species.
- Fill some gaps with leaf litter, bark or small brash, but leave others open. A pile packed solid is much less useful.
- Do not cap it with plastic or membrane. Rain reaching the pile is part of the process.
- Check stability by pushing firmly at the top. If it rocks, take a layer off. On public sites this check should be part of your routine inspections.
How log piles change over time
Year one is colonisation: fungi establish, woodlice and beetles arrive, the bark begins to loosen. By years two and three the wood softens, bark lifts and invertebrate numbers rise sharply — this is usually when amphibians and reptiles start using it. From about year five the lower layers become soft, dark and crumbly, which is when the specialist saproxylic species appear, and the pile begins to settle and lose height.
The right response to settling is to add new material alongside rather than to rebuild. A site with piles of three different ages supports far more than a site with one immaculate new pile. Never turn or tidy a log pile — the value is in the undisturbed layers.
Standing deadwood and fallen branches
Standing deadwood — a dead tree left upright, or a limb retained on a living tree — supports species that log piles do not, particularly hole-nesting birds, bats and beetles that need dry, sun-warmed wood. It is scarcer and more valuable than fallen deadwood.
It is also a safety question. On a site with public access, retain standing deadwood only where a qualified inspection says it is sound and where the fall zone contains nothing that matters. A common compromise is to reduce a dead tree to a safe monolith of three or four metres rather than felling it entirely.
Fallen branches are best left where they land if they are not in the way. Where they must be moved, drag them to a field edge or woodland margin rather than chipping them. Chipping destroys the habitat value almost entirely.
Any deadwood retained on a site with public access belongs in your tree inspection regime, with records kept.
What happens to grass cuttings after mowing a wildflower area
Here the advice reverses, and this is where most well-intentioned sites go wrong.
Wildflower meadows depend on low fertility. Grasses respond to nitrogen far more strongly than forbs do, so as fertility rises the grasses thicken, shade out the flowers and take over. Within three or four seasons a diverse sward becomes rank grass with docks and nettles at the edges.
Leaving cut material on the meadow does two things, both bad. It returns the nutrients locked up in that growth straight back to the soil, and the layer physically smothers the low rosettes of species such as Cowslip, Plantain and Hawkbit that need light at ground level through Autumn and Winter.
Removing the arisings is how you export nutrients. It is the single most important management operation in meadow restoration, and it is why a hay cut is more work than a mowing pass — you are cutting, drying, gathering and hauling, not cutting alone.
Drying briefly, then removing
The timing that works is a short window, not a choice between leaving and removing.
Cut when the majority of species have flowered and set seed, typically late July to early September depending on the season and the sward. Leave the cut material lying for two to seven days — long enough to dry and for ripe seed to drop back onto the ground, which is free overseeding. Turn it once if the weather is unhelpful.
Then take it off, all of it. Baling, a forage box, a tractor-mounted sweeper or, on small areas, a rake and a tarpaulin. What you must not do is leave it for weeks and then decide it is too much trouble.
Judgement calls: in a wet year, cut and remove sooner rather than risk a sodden mat forming. If the sward is thin and you want more seed return, leave it the full week. If the arisings are heavy and thick, spread them thinner while they dry so the sward beneath is not damaged.
How to use grass cuttings elsewhere
Meadow arisings taken off the field still have value; the point is that the value is not on the meadow.
- Hay. If the sward is clean, free of ragwort and cut in decent weather, it can be baled as hay or as bedding. Check carefully for ragwort, which remains toxic when dried and is far more dangerous in hay than standing in a field.
- Composting. Green material composts well when mixed with woody or brown material at roughly equal volumes. Pure grass forms an anaerobic, slimy mass that smells and does not break down properly. Turn it, keep it in a defined bay, and site it away from watercourses.
- Habitat piles. A heap of meadow arisings in a corner, ideally mixed with brash, is used by grass snakes for egg-laying, by slow-worms for shelter and by invertebrates through Winter. Keep these piles well away from the meadow itself so nutrients do not leach back.
- Mulch, sparingly. A thin layer around new hedge whips or trees suppresses weeds. Thin means two to three centimetres; thicker layers heat up, exclude air and kill what they are meant to protect.
What not to do: spread cuttings across other grassland you are trying to improve, tip them into a hedge bottom or woodland edge (which produces a nettle and cleaver thicket), or dump them near a watercourse where the nutrient runoff causes problems downstream.
Managing cuttings around visitor areas and operational ground
Different parts of a site call for different handling.
Visitor areas, pitches and lawns. Short, frequent mowing produces fine clippings that can be left in situ on amenity grass, where they return nitrogen to a sward you actually want green. Do not do this on any area managed for wildflowers. Never leave heaps on pitches, where they heat, smell and attract flies within a day.
Paths and hard surfaces. Blow or sweep clippings off tarmac and gravel. Wet clippings on a path are slippery, and they eventually break down into a growing medium in the joints.
Horse paddocks. Grass clippings are genuinely dangerous to horses. Fresh clippings ferment rapidly in the gut and are associated with colic and laminitis, and horses will eat them readily. Never leave clippings, or dump them over a fence, where horses can reach them. Meadow arisings intended as hay must be properly dried and checked for ragwort.
Golf areas. Rough and out-of-play areas managed as meadow need arisings removed for the same fertility reasons. Clippings on playing surfaces affect lie and roll and are normally boxed off anyway. Keep collection points away from lines of play and out of sight from tees.
Accommodation pitches and glamping units. Cut when guests are least affected and clear the same day. A heap left beside a unit over a weekend will generate a complaint.
Safety considerations
- Fire. Large heaps of fresh green material self-heat through microbial activity and, in dry conditions with sufficient bulk, can reach ignition. Keep heaps under about two metres, turn them, and site them away from buildings, hedges, fuel and dry standing vegetation.
- Pests. Rats are drawn by food waste, not grass or wood. Keep habitat piles purely vegetative and away from food service areas.
- Trip and fall hazards. Loose material near paths, steps and play areas creates hazards. Keep piles defined, edged and off routes.
- Machinery. Wrapped material is a common cause of blockages and injuries. Stop and isolate the machine before clearing, and use exclusion zones for baling and sweeping on public sites.
- Public access. Children climb log piles. Build low, build stable, and inspect. Signage helps, but design matters more.
- Ticks and stings. Long grass and habitat piles hold ticks and can hold wasp nests. Brief staff, provide the right kit, and keep visitor areas closely mown.
- Ragwort. Legal duties apply where there is a risk of spread to grazing land. Pull before cutting, remove entirely, and never leave wilted ragwort where stock can reach it.
Making it look intentional
On a leisure site the difference between “habitat” and “mess” is often presentation rather than substance.
Give every pile a defined edge — a mown surround, a low post-and-rail, or a dead hedge frame, and keep the ground around it clear. Put up a small, factual sign: what the feature is, what uses it, why it is there. Use consistent design across the site so the features read as a scheme rather than accumulated tidying-up.
Brief the team. The most common failure is a seasonal member of staff clearing a habitat pile because it looked untidy. Mark them on the site plan and in the maintenance schedule.
And keep the working areas working. A site with immaculate pitches, clean paths and clearly defined habitat features reads as competent nature-friendly grounds management. A site that has stopped tidying anywhere reads as neglected, whatever the ecological merits.
A Simple Habitat-Material Management Plan
1. Identify what your site produces
List the material generated across a year: grass from amenity mowing, arisings from meadow and rough, hedge trimmings, prunings, felled and fallen timber, leaf litter. Note the approximate volume and when in the season it arrives. Most sites are surprised by how much there is and how badly it clusters into two or three weeks.
2. Separate suitable from unsuitable
Untreated timber, brash, leaf litter and clean vegetation go to habitat use. Treated, painted or manufactured wood, anything with metal in it, diseased material under movement restrictions, and contaminated or fly-tipped waste all go to proper disposal. Set up separate collection points so the decision is made once, at source.
3. Choose locations
Mark them on a site plan: two or three log pile locations in shaded, damp, out-of-the-way spots; a compost bay with vehicle access away from watercourses; a habitat pile area for meadow arisings well clear of the meadow. Check sightlines, fire separation and public access for each.
4. Build the piles
Log piles cross-stacked, low and wide, on soil, with gaps. Dead hedges where you need a barrier as well as habitat. Add to piles annually rather than rebuilding, and let a range of ages develop across the site.
5. Remove meadow cuttings at the right time
Cut after seed set, leave two to seven days to dry and shed seed, then remove completely. Book the equipment and the labour in advance — the window is short and the weather will not wait.
6. Monitor
Record what you see: fungi on the piles, reptiles under them, how the meadow sward changes year on year. If grasses are thickening, your arisings removal is not keeping up. If a pile has vanished into the ground, add to it. Review annually and adjust.
Comparing the options
| Feature | Main purpose | Material used | Management needed | Key risks |
|---|---|---|---|---|
| Log pile | Long-term deadwood habitat for fungi, beetles, amphibians and reptiles | Untreated hardwood logs and limbs, 15cm+ diameter | Leave undisturbed; add material annually; check stability | Instability if stacked high; contamination from treated timber |
| Compost heap | Processing green waste into usable compost | Grass, prunings, leaves, mixed with woody material | Turn regularly; keep in a defined bay; monitor moisture | Self-heating and fire; anaerobic slime if grass-only; vermin if food waste added |
| Dead hedge | Barrier plus nesting and shelter habitat | Brash, thin branches, hedge trimmings between posts | Top up annually as it settles; keep line clear | Collapse if posts inadequate; can look untidy without clear edges |
| Meadow cuttings | Nutrient export from the meadow; secondary habitat or hay elsewhere | Cut sward after seed set | Dry 2–7 days, then remove completely from the meadow | Fertility rise and smothering if left; ragwort in hay; toxic to horses if fresh |
Seed, sward and what comes off it
Managing arisings properly matters most where the sward is worth protecting. Wildahome supplies regionally sourced native meadow mixes selected by soil type, and the management advice supplied with each mix covers the cutting and clearing regime that particular community needs — a chalk grassland mix and a damp meadow mix do not want the same treatment. Where an existing sward has become rank because arisings were left in place for several seasons, Yellow Rattle is often the most cost-effective first step, weakening the grasses while you get the cutting regime back on track. Seed mats suit small restoration patches around habitat features, where broadcasting seed into a confined space between log piles and dead hedges is awkward.
Talk to us about the whole cycle
If you are establishing or restoring meadow areas on a site with visitors, horses or play, the seed is only half of it — what you do with the material afterwards decides whether the sward improves or slides backwards. Tell us about your ground, your cutting equipment and where the arisings can go, and we will advise on mixes suited to the management you can realistically deliver. If your current regime is working against you, we would rather say so before you buy seed.
Frequently Asked Questions
How do I build log piles for wildlife that are safe on a public site?
Build low and wide rather than tall — under a metre high, cross-stacked at right angles for stability, sitting directly on soil in a shaded, damp spot. Keep piles ten metres or more from pitches, paths and play areas, away from fire risks, and include them in routine safety inspections. Use only untreated timber.
Can I leave grass cuttings on a wildflower meadow?
Only briefly. Leave the cut material for two to seven days so ripe seed drops back, then remove it completely. Leaving arisings in place returns nutrients to the soil and smothers low-growing rosettes, and within three or four seasons the grasses will dominate and the flowers will disappear.
What wood should never go into a habitat pile?
Treated, tanalised or creosoted timber, painted or varnished wood, plywood, MDF, chipboard, OSB, railway sleepers, and anything with nails, screws or wire still in it. These leach preservatives and adhesives into the soil or injure wildlife and handlers. If a piece of timber’s history is unclear, keep it out.
Are grass clippings dangerous to horses?
Yes. Fresh clippings ferment rapidly in the gut and are associated with colic and laminitis, and horses eat them readily. Never leave clippings or dump them where horses can reach them. Meadow arisings destined for hay must be fully dried and checked for ragwort, which stays toxic once dried.
How are log piles for wildlife different from habitat piles?
A log pile is heavy untreated timber stacked to decay slowly over a decade or more, supporting fungi and deadwood specialists. A habitat pile is the broader term for any heap of material left for wildlife, often mixing brash, leaf litter or cut vegetation. Log piles last longest and support the most specialised species.
Do I need to remove wildflower meadow cuttings every single year?
Yes, on any area managed as meadow. Nutrient export is cumulative, and skipping years lets fertility creep upwards, favouring vigorous grasses. If a year is missed, expect to see more grass and fewer forbs the following season, and consider adding Yellow Rattle to bring the grasses back under control.
Can composting grass cuttings cause a fire?
It can. Large heaps of fresh green material self-heat through microbial activity and, given enough bulk and dry conditions, may reach ignition. Keep heaps under about two metres, turn them to release heat, and site them well away from buildings, hedges, fuel stores and dry standing vegetation.
Ready to get started?
Shop: Traditional Wildflower Meadow Mix →